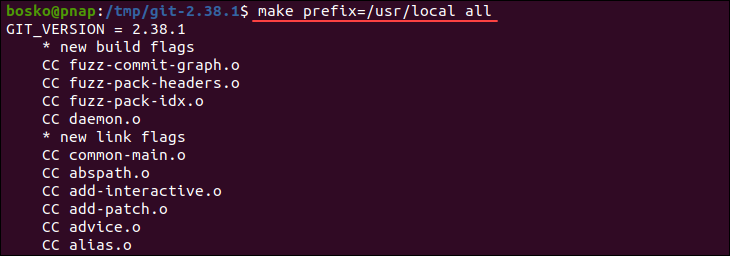
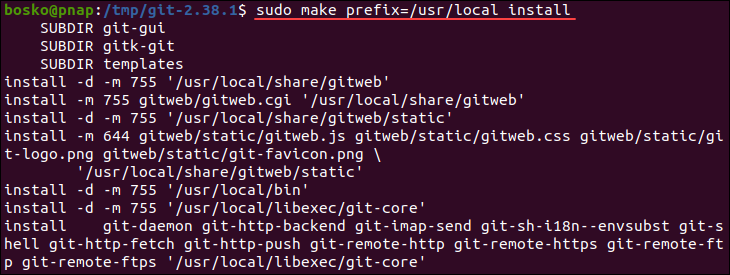
SAGARFIVE

GIT Interview Questions

I. Git Fundamental Level Interview Questions

  • Git is Source code management tool and
  • an open-source distributed version control system, available under license of GPL-2.0-only
  • to handle code among the developers for projects.
  • Developed using C language by Linus Torvalds in 2005 to develop linux kernel to handle projects.
  • Has been maintained by Junio Hamano since then..
  • Primarily Written in C, with GUI and programming scripts written in Shell script, Perl and Python

Technically we use git for : 

  • Manage projects with Repositories over cloud/local
  • Cloning Projects from remote repositories to get local copy
  • Coding collaboration among many developers across globe
  • Controlling and tracking the code with staging and committing
  • Branching is used to work with code for different features of code
  • Merge is used to combine the code over multiple features developed in multiple branches
  • Pushing the code to remote repository
  • Pulling The latest changes/version of copy from the remote repository
  • Also, we can rollback to any version of code if something went wrong at particular version of code
  • When a project is huge no of features, with heavy code changes
  • Project is developed by many contributers and developers
  • When we need to track all the changes effectively
  • When we need rollback to speific code point, if we made any mistakes
  • Having a specified area to create /develop new features
  • Need to merge features to main code once testing completed
  • These all features are provided by git, so we use git

Developers mostly uses git because

  • It is Open source
  • Over 70% of developers use Git!
  • Developers can work together from anywhere in the world with branching and merging strategy.
  • Developers can see the full history of the project with .
  • Developers can revert to earlier versions of a project.
  • Open Source : Git is an open-source tool. It is released under the GPL license.
  • Scalable : When the number of users increases, Git can easily handle such situations.
  • Distributed : Distributed means that instead of switching the project to anothermachine, we can create a “clone” of the entire repository.
  • Security : Git is secure. It uses the SHA1 (Secure Hash Function) to name and identify objects within its repository. Files and commits are checked and retrieved, by its checksum at the time of checkout.
  • Speed/fast : Most of the git operations are done on the local repository, so it provides ahuge speed.
  • Branching and Merging : We can create a separate branch for a new module of the project, commit and delete it whenever we want.
  • Staging Area : The staging area can be considered as a place where Git stores the changes.


Competitors of the git

  • SVN(Apache Subversion) – Developed by apache in 2000 –  centralised version control system tool
  • Mercurial – Released in  2005 – distributed revision control tool

Git based SCM Tools

  • Github
  • Bitbucket
  • Aws code commit
  • Git is open source and free, It also scalable.
  • It is a distributed version control system : we can work offiline, everytime we donot need to connect to remote repository to work.
  • It has very good community support when we compare to all others
  • It is fast when we compare to centralized version control system
  • It has most  of the required features
  • It has code encryption feature, when we pushing the code to remote repository: sha1
  • Version control tool is used to save a copy of code at a particular point
  • With this we can effectively work
  • We can also rollback to old version, if some thing went wrong on new code version
  • Version control tools offers wide range of features like branches, commits, merging, staging area, tracking of file changes

Types :

  1. Distributed version control system : Source code is distributed among all developers along with remote repository
  2. Centralized version control system : code stored at a central repository only we need to connect and work
  • GitHub is a Git repository hosting service. GitHub also facilitates many of its features, such as access control and collaboration. It provides a Web based graphical interface.
  • It offers both distributed version control and source code management (SCM) functionality of Git. It also facilitates some collaboration features such as bug tracking, feature requests, task management for every project.

Features of GitHub :

  • Git repositories hosting
  • Project management
  • Team management
  • Code hosting
  • Track and assign tasks
  • Conversations

More : https://sagarfive.in/git/git-tutorials/git-introduction/what-is-github/

  • SVN Full form Apache SubVersion 
  • It’s a Centralized version control system
  • SVN is simple than git but always need to be online/connected with central server to work
  • There is no staging area before the commit in Mercurial.
  • Developed using C Programming Language
  • Slower than git, commits need to done once at a time, so it required internet connection, so it takes some times
  • Mercurial is a distributed revision control tool for software developers.
  • It is supported on Microsoft Windows and Unix-like systems, such as FreeBSD, macOS, and Linux.
  • It is one of alternatives of git
  • Mercurial is released as free software under the GPL-2.0-or-later license.
  • There is no index or staging area before the commit in Mercurial.
GitMercurialSVN
It’s a distributed version control system.It’s a distributed version control system.It’s a Centralized version control system
Git is a little bit of complex than Mercurial.Mercurial is simpler than Git.SVN is simple among both but always need to be online
No VCS are entirely secured, but Git offers many functions to enhance safety.Mercurial may be safer for fresher. It has more security features.SVN is also safer, because code at remote server onlu
Git has a powerful and effective branching model. Branching in Git is better than Branching in Mercurial.Branching in Mercurial doesn’t refer the same meaning as in Git.SVN Supports Branch concepts
Git supports the staging area, which is known as the index file.There is no index or staging area before the commit in Mercurial.There is no staging area before the commit in Mercurial.
The most significant benefit with Git is that it has become an industry-standard, which means more developers are familiar with it.Mercurial’s significant benefit is that it’s easy to learn and use, which is useful for less-technical content contributors.The most significant benefit with SVN is that it has become an industry-standard, which means more developers are familiar with it.
Git needs periodic maintenance for repositories.It does not require any maintenance.SVN needs periodic maintenance for repositories.
It holds Linux heritage.It is python based.It is C based.
Git is slightly slower than Mercurial.It is faster than Git.It is Slower than both
Git supports the unlimited number of parents.Mercurial allows only two parents.supports the unlimited number of parents.
  • In General Repository, is a place where all the source code developed by developers for project is securely saved.
  • People/other developers can copy the repository, then they will get the source code 
  • Repositories are classfied as
    • Local repositories : Created and saved at local machine
    • Remote/cloud repositories  : Created and saved at local cloud machine
  • Git is Open source free to use software
  • Github is hosted with git, then this is paid at some extent along with free plan(1GB)
  • On July 2023 , the stable version is 2.41.0
Git history :
  • Git development began in April 2005, after many developers of the Linux kernel gave up access to BitKeeper, a proprietary source-control management (SCM) system that they had been using to maintain the project since 2002.
  • The copyright holder of BitKeeper, Larry McVoy, had withdrawn free use of the product after claiming that Andrew Tridgell had created SourcePuller by reverse engineering the BitKeeper protocols.
  • The same incident also spurred the creation of another version-control system, Mercurial.
  • Linus Torvalds wanted a distributed system that he could use like BitKeeper, but none of the available free systems met his needs. 
  • The development of Git began on 3 April 2005. Torvalds announced the project on 6 April and became self-hosting the next day. The first merge of multiple branches took place on 18 April.
  • Torvalds achieved his performance goals on 29 April, the nascent Git was benchmarked recording patches to the Linux kernel tree at the rate of 6.7 patches per second.
  • On 16 June, Git managed the kernel 2.6.12 release.
  • Torvalds turned over maintenance on 26 July 2005 to Junio Hamano, a major contributor to the project.
  • Hamano was responsible for the 1.0 release on 21 December 2005.
  1. Bitbucket
  2. GitHub
  3. GitLab
  4. Amazon AWS CodeCommit
  5. SourceForge
  • AWS CodeCommit is a secure, highly scalable, fully managed source control service that hosts private Git repositories.
  • When we need to have a private git server, instead of using public git host services like github, bitbucket, aws code commit is one of the best choice
  • Aws Code commit host git, maintain, back up, or scale your own source control servers.
  • Create up to 1,000 repositories by default(More on request)
  • Git development began in April 2005, after many developers of the Linux kernel gave up access to BitKeeper, a proprietary source-control management (SCM) system that they had been using to maintain the project since 2002.
  • The copyright holder of BitKeeper, Larry McVoy, had withdrawn free use of the product after claiming that Andrew Tridgell had created SourcePuller by reverse engineering the BitKeeper protocols.
  • The same incident also spurred the creation of another version-control system, Mercurial.
  • Linus Torvalds wanted a distributed system that he could use like BitKeeper, but none of the available free systems met his needs. 
  • The development of Git began on 3 April 2005. Torvalds announced the project on 6 April and became self-hosting the next day. The first merge of multiple branches took place on 18 April.
  • Torvalds achieved his performance goals on 29 April, the nascent Git was benchmarked recording patches to the Linux kernel tree at the rate of 6.7 patches per second.
  • On 16 June, Git managed the kernel 2.6.12 release.
  • Torvalds turned over maintenance on 26 July 2005 to Junio Hamano, a major contributor to the project.
  • Hamano was responsible for the 1.0 release on 21 December 2005.
  • Primarily Written in C, with GUI and programming scripts written in Shell script, Perl and Python
  • Size limitations: Git repositories can become quite large over time, and it can become difficult to manage large binaries or other large files.

  • Concurrent access limitations: Git is not designed to handle concurrent access to the same repository by multiple users. This can lead to conflicts and merge issues.

  • Learning curve: Git can be difficult to learn, especially for those who are new to version control systems.

  • Limited support for Windows: Git has limited support for Windows, which can make it difficult to use on that platform.

  • No support for large binary files: Git is not designed to handle large binary files, so it is not suitable for storing large multimedia files.

  • Git is available on both CLI and GUI
  • Git bash is one of the cli tool and git cli works on cmd/linux terminal/powershell
  • Git GUI tools are Git Desktop, source tree, we can find more @ https://git-scm.com/downloads/guis/
  • Git is distributed version control system then we can work offline
  • SVN is centralized version control system, then for every commit we need to connect to internet push the commit, it takes time, so it is slow compared to operation time
  • Code distributed across all the developers, if anything happens at remote central repository while developing  it is very difficult to handle

II. Git Installation & Setup Based Interview Questions

Windows : 

  • You can Download git executable file for windows @ https://git-scm.com/downloads
  • Once file downlaoded , install it
  • It’s doen

Linux : 

  • For Apache Linux/Centos/redhar
    • sudo yum install git -y
  • For Ubuntu
    • sudo apt-get install git -y
  • Git for Windows requires Windows 7 Service Pack 1 or later. The last version to support Windows Vista and Server 2008 was v2. 37.1. The last version of Git for Windows to support Windows XP and Windows Server 2003 is v2.
  • Git works most of the linux machine variants
  • Git Desktop
  • SourceTree
  • TortoiseGit
  • GitKraken

More @ https://git-scm.com/downloads/guis/

To check the version git : git –version

Windows: 

  • Run the below command on cmd/Terminal
    • git update-git-for-windows
  • Once after process completes, Windows Dilogue box ask us install, click yes to proceed

Linux: 

  • Ubuntu :
    • sudo apt-get update
    • sudo apt-get install git
  • CentOS/Redhar
    • sudo yum update
    • sudo yum install git

MAC: Using brew

  • /usr/bin/ruby -e “$(curl -fsSL https://raw.githubusercontent.com/Homebrew/install/master/install)”
  • brew update
  • brew install git
  • brew upgrade git


Windows :

  • Backup content if you have anythign ,
  • Unistall current version
  • Download the required version from @ https://mirrors.edge.kernel.org/pub/software/scm/git/
  • unzip/extract and install


Linux ubuntu : 

  • Start by installing the required dependencies for Git on Ubuntu. Run:

    sudo apt install make libssl-dev libghc-zlib-dev libcurl4-gnutls-dev libexpat1-dev gettext unzip -y

  • Create a new tmp directory and move to that directory:

    mkdir tmp
    cd /tmp

  • Open a browser window and navigate to the following address:

    https://mirrors.edge.kernel.org/pub/software/scm/git/

    From the list of Git releases, find the version number for the latest release (or another specific version you want to install) and enter the version number in the following command:

    curl -o git.tar.gz https://mirrors.edge.kernel.org/pub/software/scm/git/git-X.XX.X.tar.gz

    For example, the latest version at the time of writing this article is 2.38.1. We will use the curl command to download Git version 2.38.1 and rename the downloaded file to git.tar.gz:

    curl -o git.tar.gz https://mirrors.edge.kernel.org/pub/software/scm/git/git-2.38.1.tar.gz
    Downloading the latest Git version.

    The command downloads the Git tar file.

    4. Uncompress the tarball file by running:

    tar -zxf git.tar.gz

    5. Move to the new directory:

    cd git-*

    6. Compile the package by running the following command:

    make prefix=/usr/local/
    Compiling the Git source code.

    7. Once the process completes, install Git by running:

    sudo make prefix=/usr/local install
    Installing Git from the source code on Ubuntu.

    8. Verify the Git installation by running:

    git --version
    Checking Git program version.
  • Git host : Git host is where the git server is installed, and it offers git remote repository to be connected and push code changes
  • Git client : Git installed on local machiene to connect to git host/server to clone the source code and push it to remote server/ git host server

On Linux Server : 

  • Install Git on your server
    • sudo apt-get install git-core
  • Then add a user for Git.

    • sudo useradd git

    • passwd git

  • Adding ssh authentication
  • Creating bare repository for hosting a repository as remote repository

Full @ https://www.inmotionhosting.com/support/website/git/git-server/
https://git-scm.com/book/en/v2/Git-on-the-Server-Setting-Up-the-Serverhttps://git-scm.com/book/en/v2/Git-on-the-Server-Setting-Up-the-Server

  • A bare repository in Git just contains the version control information and no working files (no tree) and it doesn’t contain the special .git sub-directory.
  • git init one –bare
  • It is used as remote repository, users can connect to that repository and push their changes
  • Bare repo save the files , but do not shows the working tree(project files),
  • But when we clone the bare repository we can see the working tree.

More : https://sagarfive.in/git/git-tutorials/3-git-terminology/what-is-git-bare-repository/

we can backup git server repository using this command with another git instance :
git clone –bare <git-repo-url.git>


Full info :  @ https://bruhtus.github.io/posts/git-repo-backup/#backup-git-repository-locally

We can config 

  • git username :  git config –global.username “<username>”
  • git email : git config –global.email “<youremail>”
  • For linux vim as default editor: git config –global core.editor Vim or 
  • For windows making notepad as default editor :  git config –global core.editor notepad.exe
  • git config command is used to configure the git
  • We can configure username and email
  • Also we can setup some default tools like text editors
  • Configuring the email and username
    • git username : git config –global.username “<username>”
    • git email : git config –global.email “<youremail>”
  • Setting up default editor:
    •  git config –global core.editor Vim

We can set alias for git commands using git config commands

Set up an alias for each command:
$ git config – -global alias.co checkout
$ git config – -global alias.br branch
$ git config – -global alias.ci commit
$ git config – -global alias.st status

III. Git Repository Interview Questions

  • Source code is known as code developed by Developers for the projects
  • Managing/organising the source code effectively, such as tracking the changes, enabling rollback/undo mistakes, Maintaining the history.
  • Pushing the code with change history to remote repository
  • The mentioned can be done by SCM tools such as git, svn, Mercurial

Benefits of source code management ?

  • Complete version history (Code change history)
  • More effective collaboration by Team of developers
  • Easy Maintaine confusion free source code developed by many developers
  • Branching gives extra space for effective code developement
  • Rollback to old code is possible with SCM with something went wrong latest code
  • Maintaine complete changelog infomation
  • We can save code in local system or upload to remote repository
  • Remote Repository SCM are very much helpful for opensource application development
  • Version control/source control is the handle of tracking and managing changes to source code.
  • It supports creating different versions of file collection. Each version captures a snapshot of the files at a certain point of time(ex: Creating commit in git)
  • You can revert the collection of files using the snapshot. VCS allows you to switch between these versions.
  • These versions are stored in a specific place, typically called a repository.
  • Types 
    • Local version control system : It’s a user end specific – it’s a local database of tracking of changes to  files in the code. Copy of code stored in a particular developer, so relation to other developers.
    • Central version control system : It’s a central server where code is stored, everyone can connect and work with that code and make changes , so it helps to handle work by many developers.
    • Distributed version control system : Code stored at server with high availability and developers can copy that code to their local machine, when ever developers want ,they can send modified/developed code to server, and modified code can be updated to all developer local machines when they want to use the code.
  • For More : https://sagarfive.in/git/git-tutorials/3-git-terminology/version-control-system/

Central version control system : it’s a central server where code is stored, everyone can connect and work with that code and make changes , so it helps to handle work by many developers.

Image credits : medium user
  • Centralised Version Control is a version control system using server/client model and server contains all the history(Commit history) of source code.
  • In CVS, a client needs to get a local copy of the source from the server, do the changes and commit those changes to the central source on the server.
  • Offline working not possible, have to connect with repository and you will get only the file what you want to edit, you do not get entire code
  • Developer must and should connect to the repository to commit/save the changes on the code/file.
  • If you are offline or server fails, then you won’t able to deal with Repository
  • CVS is slower as every command needs to communicate with the server.

Distributed version control system : code stored at server with high availability and developers can copy that code to their local machine, when ever developers want ,they can send modified/developed code to server, and modified code can be updated to all developer local machines when they want to use the code.

Image credits : medium user

Advantages of Distributed Version Control System – DVCS :

  • Work offline
  • Good backup/saving of code changes as versions(commits)
  • Share the code among many developers
  • Very much helpful for open source contribution for open source application/tools
S.NoKeyCentralised Version ControlDistributed Version Control
1WorkingIn CVS, a client needs to get a local copy of the source from the server, do the changes and commit those changes to the central source on the server.In DVS, each client can have a local branch as well and have a complete history on it. Clients need to push the changes to the branch which will then be pushed to the server repository.
2Learning CurveCVS systems are easy to learn and set up.DVS systems are difficult for beginners. Multiple commands need to be remembered.
3BranchesWorking on branches is difficult in CVS. Developers often face merge conflicts.Working on branches is easier in DVS. Developers face lesser conflicts.
4Offline AccessCVS systems do not provide offline access.DVD systems are workable offline as a client copies the entire repository on their local machine.
5SpeedCVS is slower as every command needs to communicate with the server.DVS is faster as most users deal with local copy without hitting the server every time.
6BackupIf CVS Server is down, developers cannot work.If the DVS server is down, developers can work using their local copies.
  • Repository is a directory which contains all files related to a project
  • We can make normal repository to git repository , by installing git in your machine
  • and intialising that directory with git init command, that repository converts git repository
  • Types of Git repositories are :

    1. Non bare repository (Normal repository)
    2. Bare repository


  • Non bare repository (Normal repository) :

    Non-bare repositories, users can modify the existing repository and create new versions. By default, the cloning process creates a non-bare repository.


  • Bare repository :

    A bare repository in Git just contains the version control information and no working files (no tree) and it doesn’t contain the special .git sub-directory.

Types of Git repositories are :

  1. Non bare repository (Normal repository)
  2. Bare repository


  1. Non bare repository (Normal repository) :
  • Non-bare repositories, users can modify the existing repository and create new versions. By default, the cloning process creates a non-bare repository.


2. Bare repository :

  • A bare repository in Git just contains the version control information and no working files (no tree) and it doesn’t contain the special .git sub-directory.
  • A bare repository in Git just contains the version control information and no working files (no tree) and it doesn’t contain the special .git sub-directory.
  • git init one –bare
  • It is used as remote repository, users can connect to that repository and push their changes
  • Bare repo save the files , but do not shows the working tree(project files),
  • But when we clone the bare repository we can see the working tree.

Git local repository : 

1. Create your project and open that directory , right click and select git bash here

2. Initializing the git

git init

3. Check your git project status

git status


4. Now we can see that git showing what files are git tracking, so now normal directory is became git repository ,


Remote repository :

  • Open github and create a repository, that is called as a simple git remotely hosted repository
  • A bare repository in Git just contains the version control information and no working files (no tree) and it doesn’t contain the special .git sub-directory.
  • git init one –bare
  • It is used as remote repository, users can connect to that repository and push their changes
  • Bare repo save the files , but do not shows the working tree(project files),
  • But when we clone the bare repository we can see the working tree.

  •  Git bare repository acts as remote repository, users can connect to that repository and push their changes and pull/get the latest changes, Bare repo save the files , but do not shows the working tree (project files).
  • Git init is used to convert a normal source code directory to git repository
  • Once initialyzation done, .git folder will created inside the project directory, where all the changes are saved
  • Once initialyzation done, all the file changes inside the directory will tracked
  • Initializing the git
git init
  • .git folder is created inside the projecte directory, once after the git init command run using the cmd within the folder
  • .git folder is git native folder, we saves all the files and file changes
  • If we remove .git folder, then git tool/software won’t recognize the directory as git and all the project data will be lost

IV. Git Life cycle and workflow

Project workflow of code changes :


  • Working Directory :
    • The directory where we have all the source code of a project,
    • once git init command run inside the directory using the cmd/terminal, that is converted into working directory
  • Staging Area : 
    • Staging area where all files are tracked
    • git add <file name>
    • then files will be added , from onwords the files will tracked
  • Local Repository :
    • by commiting the changes, the files will be moved to the local repository 
  • Remote Repository : 
    • Remote repository is a git hosted server, when all the source code saved, available for clone 24 by 7
    • ex: pushing the code to github

Life cycle of git: 

Project directory –> Working Directory –> Staging Area –> Local Repository –> Remote repository(Files uploaded)

New files,features,changes added, then this steps will works repeatedly

Writingcode : Working Directory –> Adding files : Staging Area –> Committing changes: Local Repository –> Pushing the changes : Remote repository(Files uploaded)

  • Working directory is Where the source code is saved. We have to convert the folder into a working directory by running a git command .  git init  we run the git commands in git bash/terminal
  • Observations: .git folder created on working/project directory, and in git bash you can see name master.


mkdir <repo-folder-name>
cd <repo>git init
git init
  • Working directory contains .git folder, we can add project files,folders inside working directory
  • Even after adding the files, git won’t track the changes of files
  • To Enable file tracking  we need to add the files to staging area using this command


To add one file at a time to staging areaGit add <file name>
To add multiple files and folders to staging areagit add <file1> <file2> <folder>
To add all files and folders at a time to staging areagit add .

To see staged/tracked fiels status : git status

Types of staged files :

  1. Untracked(??) : Not added
  2. Tracked(A) : Added using git add <files>
  3. Modified(M) : Once after added to staging, if files is modified


Git Local Repository ( git commit) :

  • it is snapshot/backup stage of code
  • if you done changes in your source code, then we want to save the changes at that particular stage
  • We can save them by committing with this command


Single line commitGit commit -m “commit name”
Commit with large information(editor opens)git commit or git commit -v

V. Git Working Directory

  • Working directory is Where the source code is saved. We have to convert the folder into a working directory by running a git command .  git init  we run the git commands in git bash/terminal
  • Observations: .git folder created on working/project directory, and in git bash you can see name master.


mkdir <repo-folder-name>
cd <repo>git init
git init
  • Git init is used to convert a normal source code directory to git repository
  • Once initialyzation done, .git folder will created inside the project directory, where all the changes are saved
  • Once initialyzation done, all the file changes inside the directory will tracked
  • Initializing the git
git init
  • Inside the git folder, we have hooks, info, logs, objects, refs directories and config… files

  • If we remove .git folder,
  • then git tool/software won’t recognize the directory as git and
  • all the project data, logs, commits and branches (exept current checkout branch) will be lost
  • A bare repository in Git just contains the version control information and no working files (no tree) and it doesn’t contain the special .git sub-directory.
  • git init one  – – bare
  • It is used as remote repository, users can connect to that repository and push their changes
  • Bare repo save the files , but do not shows the working tree(project files),
  • It donot have working directory
  • But when we clone the bare repository we can see the working tree.
  • Git bare repository is like normal repository
  • But do not have working directory
  • It only save the data inside the .git folder of the git repository
  • as like the git workflow, it will work

VI. Git Staging Area

  • Working directory contains .git folder, we can add project files,folders inside working directory
  • Even after adding the files, git won’t track the changes of files
  • To Enable file tracking  we need to add the files to staging area using this command


To add one file at a time to staging areaGit add <file name>
To add multiple files and folders to staging areagit add <file1> <file2> <folder>
To add all files and folders at a time to staging areagit add .

  • To Enable Staging/file tracking, we need to add the files to staging area using this command
.
To add one file at a time to staging areaGit add <file name>
To add multiple files and folders to staging areagit add <file1> <file2> <folder>
To add all files and folders at a time to staging areagit add .
  • git add command is used to add the files of project source code to staging area/tracking
  • git add <file> or <file> <file2> or git add .
To add multiple files and folders to staging areagit add <file1> <file2> <folder>
To add all files and folders at a time to staging areagit add .
  • Get inside the project(Git repository project) directory using cmd/terminal
  • Run the git status
  • This will show us what are files we have, which they are added to staging area or not
  • The files which are shown like ?? , Red color and untracked that are not staged
  • all the other are staged
  • Git status is a command to see the file tracking information of git working directory
  • To verify the files are added to staging area, we need to run git status , then we can see the response
  • As the Staged files (git added files) with green colour, as shows changes to be committed
  • And non staged files (non git add files) are shown with red colours, as shows untracked files.


To see statusgit status
To see status in shortgit  status -s

Tracked files : Once the files added to staging area using git add . , then the files are taracked files, git will track the changes in that files

To check the status : git status

Types : 

  1. Modified Files (M) : This shows when the files are modified once after staged
  2. Unmodified : This shows when the files are not modified once after staged

UnTracked files : 

  • Once the project is created, if check the git status , all the files are shown like Untracked (??)
  • if we add all the files, then that are moved to staging area(tracking starts)
  • If new files(features) are added to project, that new files are not added to staging, so if we check the git status then it will show us untracked


Modified Files :

  • After tracking enabled by the git add command, if you made some changes on any file, the git tracking system will identify it, mark it as a Modified file.
  • For an example : Edited the one.txt , added some information and saved
  • We can the git status response as modified , changed not staged
  • So we again need to add the files to staging area by running git add <Modified file name>

Git short status indication :

When we run the git status on working directory, we can see the shortcut letters

A: Staged/Tracking File

M: Modified

??: Untracked/Not staged file

AM : Staged/Tracking File and modified

A: Staged/Tracking File

M: Modified

??: Untracked/Not staged file

AM : Staged/Tracking File and modified

Remove files from Staging area (un staging) / un Tracking :

  • If you want to remove a file from staging/tracking with any reason
  • We can simply remove it by using this command


git rm –cached <filename>
  • By removing a staged files, it will be moved to untracked files list

git ignore  is used to hide/stop adding some file types to staging area:

  • whenever programmers develop a project, rather than source code, developers uses a lot of third party or development files like logs, class files , they don’t need in source code when we pushing to remote repository
  • here we can use .gitignore, create a file with .gitignore in the working directory.
  • add eliminated files like *.log or *.class , *.dev , save file ,
  • when you add git add . , it won’t add log, class, log.

git ignore  :

  • whenever programmers develop a project, rather than source code, developers uses a lot of third party or development files like logs, class files , they don’t need in source code when we pushing to remote repository
  • here we can use .gitignore, create a file with .gitignore in the working directory.
  • add eliminated files like *.log or *.class , *.dev , save file ,
  • when you add git add . , it won’t add log, class, log.

We can see with demo example:

(i) Created gitignore folder, and moved in to it

mkdir gitignore
cd gitignore

(ii) Created log files : tests.log, update.log, status.log files with in the folder

touch tests.log, update.log, status.log

(iii) Created normal files : styles.css, support.js

touch styles.css, support.js

(iv) Created .gitignore file

vim .gitignore
Press I to insert modeAdd*.log*.logsSave it by pressing ESC, next wq!

(v) Initialising the directory as git repository

git init

(vi) Adding all files to staging area

git add .

(vii) Checking what files are added to staging area

git status

(viii) Observation:

We can see only styles.css, support.js are added to staging area

Files having extension .log are skipped for moving into staging area

Remove files from Staging area (un staging) / un Tracking :

  • If you want to remove a file from staging/tracking with any reason
  • We can simply remove it by using this command


git rm –cached <filename>
  • By removing a staged files, it will be moved to untracked files list
  • Stash is used for leaving the unfinished work, in such a way the git cannot access it
  • You don’t want to make a commit of half-done work. Git stashing allows you to do so.
  • and continue work on some other files, This can be done by git stash.
  • We use it for Simple way to hiding unfinished work from git staged file tracking

To stash(hide) the staged files :

  • Creating and committing three files with names one, two and three
  • Data added into one, two
  • But data adding is incomplete in three
  • In this case everytime if run git status , it shows in staging area
  • To hide the three file from staging area
  • We can stash the staged files


git stash


Once after running stash command, the staged files will be hidden And git status will shows working tree is cleanThree file also removed from working directoryWe can see the demo in below screenshot

To stash staged(tracking) and unstaged(untracked) files:

  • To hide staged/unstaged(untracked) files we can use git stash -u command


git stash -u
  • Created four, five files
  • Four added to staging/tracking
  • Five is not added for staging area/tracking
  • Now with the help of stash we can hide both the staged and untracked files

o unhide the stashed files :

  • Shows back the tracked/untracked files on git status


git stash pop

Git stash commands :

1To stash(hide) the staged filesgit stash
2To stash(hide) staged/untracked filegit stash -u
3To Git Stash Save (Saving Stashes with the message)git stash save “<Stashing Message>”  
4To see list of stashesgit stash list
5To get back to stashed filegit stash pop
6To bring the older stash outgit stash pop stash@{stash-number}
7To drop last stashgit stash drop
8Stashed some work on a particular branch and continued working on that branch.git stash branch <Branch Name>  
9Deleting all the available stashes at oncegit stash clear  

VII. Git Local Repository and Commits

  • git commit can take path names as arguments:
    • git commit -m "some message" file1 file2
  • for instance. But this implies the --only flag, i.e., commit only changes in file1 and file2. You can also run:
    • git commit -m "some message" --include file1 file2

here we skipped  : git add file1 file2

Git Local Repository ( git commit) :

  • it is snapshot/backup stage of code
  • if you done changes in your source code, then we want to save the changes at that particular stage
  • We can save them by committing with this command
Single line commitGit commit -m “commit name”
Commit with large information(editor opens)git commit or git commit -v

We can create local repository with commits created : After succesfull commits, the files are moved to area(logical represent) is called git local repository

Single line commitGit commit -m “commit name”
Commit with large information(editor opens)git commit or git commit -v
  • By committing the staged files , then that files moves to local repository
  • git commit -m “commit-one”
  • git commit(Moving to local repository) can take path names as arguments:
    • git commit -m “some message” file1 file2
  • for instance. But this implies the –only flag, i.e., commit only changes in file1 and file2. You can also run:
    • git commit -m “some message” –include file1 file2
  • here we skipped  : git add file1 file2
  •  

Same question : Q81

  • Git commit it is snapshot/backup stage of code in that particular branch
  • if you done changes in your source code, then we want to save the changes at that particular stage
  • We can save them by committing with this command

Git commit :

Single line commitGit commit -m “commit name”
Commit with large information(editor opens)git commit or git commit -v
  • To see the git commit history, we can use git log command
  • it will shows all the information related to git commits
  • Commit history always shows in time lienier manner with branch specific
  • HEAD is always points to latest commit in that branch
Commit history with informationgit log
Commit history with information in one linegit log –oneline
  • Git log shows us
    • Commit hash and shows head pointing which branch on latest commit
    • Author
    • Date
    • message
  •  
  • To see the information of a specifi commit
    • git show <commit hash>
  • To get commit hash
    • git log –oneline
  • To view the commit creation full information
    • git log

  • Git amend is used to change the last commit message/information
  • Once run the commit an editor opens, edit the information/message, save it
  • Git ammend only changes the commit message of previous last commit only
  • It won’t change anything
  • If it is necessary to change the commit message for an old commit or a set of commits, then an interactive rebase can be used:
  • git rebase -i HEAD~n, Where n is the number of commits to display.
  • Let’s add some commits and try to change the messages

We can see the log responce , six is renamed as six-two.txt

  • Edit last broken commit 
    • git commit –amend
    • Editor opens, add the information and save it
  • To Edit old commits
    • git rebase -i HEAD~n
    • Where n is the number of commits to display.
    • Editor opens, add reword infront of commit what you want to edit
    • and save it 
  • git rebase -i HEAD~n
  • Here n is the last number of commits which you want to arrange
  • Example : git rebase -i HEAD~5
  • Editor opens the commit history file, rearrange(move lines) and save
  • Bisect is used to mark a commit as good or bad commit
  • it is helpful in debugging to identify bad commits
  • Fix the issues and as good commits


To mark commit good with bisect
(bisect used for debugging)
git bisect good <commit-id>
To mark commit bad with bisectgit bisect bad <commit-id>
To list the bisect commitsgit bisect log
To enter bisect start
And mark all commits as good from now
git bisect start
git bisect good
To enter bisect start
And mark all commits as good from now
git bisect start
git bisect bad
To exit bisectgit bisect reset
image credit : wavemaker
  • This feature is provided in git, so that developers can create code related to different functionalities on separate branches.
  • This helps the development team in creating the code in an uncluttered way. Later this code can be merged with the master branch.
  • Master is final developed code that can move to testing , beta and production servers.
  • Simple project structure of Git types of branches : Feature branches, Develop, Release branches, Hotfixes, Master
Creating new branchgit branch <branch-name>Ex: git branch feature-1
Move to a branchgit checkout <branch-name>Ex: git checkout feature-1
  • Combining the branch commits on git.
  • This works as a merging child branch → master/parent branch.
  • Steps to merge :
    • Checkout to branch(On which branch you need to copy  commits)
      • git checkout master
    • Run the merge command
      • git merge feature1

  • Observations :

    (i) Git merge will add commits to new branch with same commit hash and add all files are copied from committed branch

    (ii) it won’t deletes the files from the old branch

  • Copy the hash code of a commit using :
    • git log –online
  • Checkout to a branch, where you want to copy the commit
    • git checkout master
  • Use merge to copy the commit with same commit hash
    • git merge <commithash>
  • When we merge the commits from one branch to another 
  • The commits are copied to mentioned branch as time lienier manner
  • First created commit shows at last …… to latest one is first
  • It’s like time order


Example : From(feature1) –> To Branch(Master)

  • To add commits from one branch to another branch as latest commits,
    We use git rebase merge
  • First go(checkout) the branch From Branch where you want to copy the commit
    • git checkout feature1
  • And the runt the rebase command in that branch
    • git rebase <To branch name>
  • Then checkout to To branch
    • git checkout master
  • The merge the commits
    • git merge feature1

To see example with exersize task : https://sagarfive.in/git/git-tutorials/7-git-commit/git-merge-rebase-copying-commits-as-latest/

  • The term reset stands for undoing changes.
  • The git reset command is used to reset the changes.
  • git reset –hard <file-Commit-B commit hash>
  •  

Example task : 

–> Reset changes to file-Commit-B commit from file-Commit-C commit

git reset –hard <file-Commit-B commit hash>
git reset –hard 327bce5

Before :


After :

-> After reset, we can see only two files, means changes reverted to 2nd commit

  • Reset changes to file-Commit-B commit from file-Commit-C commit
git reset –hard <file-Commit-B commit hash>
git reset –hard 327bce5
  • Before :


  • After :


Note : No new commit added, moved to old commit, showing two commits only

The term reset stands for undoing changes. The git reset command is used to reset the changes.
The git reset command has three core forms of invocation. These forms are as follows.


(i) Soft : Move to that specific commit on that branch, by moving all files to staging area
(ii) Mixed : Move to that specific commit on that branch, by moving all files to Working directory
(iii) Hard : Move to that specific commit on that branch, by removing files(not shown in the directory, but keeps in .git folders)


Reset to a commit by moving files to staging area: 

Task : Reset changes to file-Commit-B commit from file-Commit-C commit

git reset –soft <file-Commit-B commit hash>
git reset –soft 327bce5

Before :

After :


 git reset –mixed :

git reset –mixed is used to move to a specific commit by moving all the files at the commit to working directory

Task : Reset changes to file-Commit-B commit from file-Commit-C commit

git reset –mixed <file-Commit-B commit hash>
git reset –mixed 327bce5

Before :


After :

git reset –hard :

git reset –hard is used to move or rollback to specific commit in the same branch by removing the files (but files not deleted, that are stored at .git folder,  if we move to latest commit , we can get back the files)

Task : Reset changes to file-Commit-B commit from file-Commit-C commit

git reset –hard <file-Commit-B commit hash>
git reset –hard 327bce5

Before :

After :

  • Git revert is used to move to a specific commit changes in a branch by creating a new commit has a latest one along by keeping old commit in that branch.
  • With this if we need to go back to previous also possible
  • git revert <commit-hash-to-revert>


  • Observations :

    • It added a new commit with changes
    • Changes shows that file-C deleted at working directory
    • Means it will revert to that commit stage without that committed files(it removes the files which committed by that specific commit)
    • Insteading of moving back to old commit , it will create a new commit
    • So in real time it will not delete any files from the any commit

Git rebase drop : dropping the commit

  • drops the exising commit from commit history
  • we drop commit by running this command git rebase -i HEAD~n ( n is number of last commit count)
  • An Editor opens , it shows commits names , there we need to change pick with drop infront of the specific commit which we want to drop
  • Before commit drop
  • Running the rebase command
  • Editing the rebase file with options
  • Replace pick with drop
  • Checking the git log
  • Fourth commit is not showing
  • When code developers create many commits,
  • after releases we don’t need that many commits ,
  • then we can merge some commits with the previous commit.
  • git rebase -i HEAD~n
  • Here we have 5 commits (0..4 is 5 , then n=4)
  • git rebase -i HEAD~4
  • An interactive terminal opens
  • Add squash replacing pick besides the commit hash which you want to merge with it’s latest/top of commit
  • This is hides the comment when we run git –log

replace pick with squash on before commit hash what you what to merge

  • Then after if we see git log, the squash commit will not be in the list , but the files still available in the working directory

  • Cherry-picking copies the some commit information and changes from one branch into another branch.
  • It will create new commit and adds the changes/information
  • In case you made a mistake and committed a change into the wrong branch, but do not want to merge the whole branch.
  • We can use git cherry-pick <commit-hash>
  • And You can revert the commit(which branch you made mistake) 
 

(i). Checkout to a particular branch :  git checkout master

(ii). Command : git cherry-pick <commit-id>

(iii)To get commit id by this command : git log –oneline


Observations:

(i) Specific commit added to master from feature-1 branch as latest commit

(ii) We can see commit-hash of feature-1 is a5dee03 and the commit hash in the master is 64bd9e7
That means it creates a new commit and copies the files/changes/information

  • git cherry-pick <commit-hash>
  • Steps :
    • Copy the commit hash which we want to copy  (From branch) : git log –online (on From branch) and copy the commit hash
    • Checking out to the branch (to branch) : git checkout <to branch>
    • run the cherrypick commmand : git cherry-pick <commit-hash>
    • Check the chanages using : git log –oneline
  • This will copy the changes made from the old commit, adds a new commit in to branch with the changes
  • git diff is used to show changes between commits, commit, and working tree, etc.
  • Mostly helpful when merge conflict to identify changes made by commits


1Track the changes of two commitsgit diff <commit1-sha> <commit2-sha>
2Track the changes of two branches git diff <branch 1> < branch 2>  
3Track the changes of latest commit
(* Not confirmed)
git diff HEAD
4Track the changes of staged filesgit diff –staged  
5Track the changes of unstaged files
(* Not confirmed)
git diff
4Track the changes made of a single filegit log -p –follow — filename  
  • To see the changes made in the last commit without using a hash, you can use the git show HEAD command.
  • The HEAD here refers to the most recent commit within the git history of the project. war.
    • You can use HEAD~1 to go back an extra commit, HEAD~2 to go back two, etc.
    • Last commit : git show HEAD~1
    • Last Second commit : git show HEAD~2
    • Last n commit : git show HEAD~n
    • Specific commit : git show <commit-hash>

Tags make a point as a specific point in Git history. Tags are used to mark a commit stage as relevant. We can tag a commit for future reference. Primarily, it is used to mark a project’s initial point like v1.1.

  • When we want to create a release point for a stable version of your code we use git tag or
  • When we want to create a historical point that you can refer to reuse in the future.we create tag
  • Tags are much like branches, and they do not change once initiated.
  • We can have any number of tags on a branch or different branches
  • Tags are named like v0.1, v1.0…

Git Tag Commands :

1Git Creating Annotated taggit checkout <Branch name> 
git tag <tag name> -m ” <Tag message> -a <developer-x1>
git tag project-one-v0.1 -m “Version 0.1” -a “Developer-x1”
2Git Create taggit checkout <Branch name> 
git tag <tag name>
git tag project-v1.0  
3Git List Taggit tag or
git show
4To see Specific tag infogit tag show project-v1.0  
5List tags with filter patterngit tag -l “<pattern>.*”
git tag -l “project-one*”  
6Deleting Tagsgit tag –d <tagname>  or
git tag –d project-v1.0  
7Delete a Remote Taggit push origin -d <tagname>  
8Delete Multiple Tagsgit tag -d <tag1> <tag2> 
9Git Checkout Tags with branchgit checkout -b < new-branch-name> <tag-name>  
10Create a tag from an older commit:git tag <tagname> < commit-hash> 
git tag <project-one-v2.2> 6tgf877ytd
11Renaming tag(i) Create new tag : git tag <new_tag_name> <old_tag_name>
Example : git tag v1.7 v1.6(ii) Delete old tag : git tag -d <old_tag_name>
Example : git tag -d v1.6
(iii) Pushing the tag : git push origin <new_tag_name> :<old_tag_name>
Example : git push origin v1.8 :v1.7
12Cleaning the tags
collaborators may still have the old tag, this command update the tags on contributors computers
git pull –prune –tags

Pushing the tags to github : 

13Pushing One tag to githubgit push origin <tagname>  
14Pushing all tags at oncegit push origin –tags  
15Deleting a remote taggit push origin -d <tagname>  
16Deleting Multiple remote tagsgit push origin -d <tag1> <tag2> 

VIII. Git Commit commands

  • Git commit it is snapshot/backup stage of code in that particular branch
  • if you done changes in your source code, then we want to save the changes at that particular stage
  • We can save them by committing with this command

Git commit :

Single line commitGit commit -m “commit name”
Commit with large information(editor opens)git commit or git commit -v
  • To see the git commit history, we can use git log command
  • it will shows all the information related to git commits
  • Commit history always shows in time lienier manner with branch specific
  • HEAD is always points to latest commit in that branch


Commit history with informationgit log
Commit history with information in one linegit log –oneline
  • git show command will return the commit infomation
  • It shows commit full hash
  • Author
  • Date
  • Commit message
  • difference to old file to newly changed file
  • shows the index of file change
  • shows the content changed by executing diff –git <old-file> to <new-file>

git show commands:

To see latest commit info with changes(diff) on old to new filesgit show
To see specific commit info with changes(diff) on old to new filesgit show <commit-hash>
To sell last commit infogit show HEAD
To see second last commitgit show HEAD~2
To see last nth commitgit show HEAD~n
  • Git amend is used to change the last commit message/information
  • Once run the commit an editor opens, edit the information/message, save it
  • Git ammend only changes the commit message of previous last commit only
  • It won’t change anything
  • If it is necessary to change the commit message for an old commit or a set of commits, then an interactive rebase can be used:
  • git rebase -i HEAD~n, Where n is the number of commits to display.
  • Let’s add some commits and try to change the messages

We can see the log responce , six is renamed as six-two.txt

  • Bisect is used to mark a commit as good or bad commit
  • it is helpful in debugging to identify bad commits
  • Fix the issues and as good commits


To mark commit good with bisect
(bisect used for debugging)
git bisect good <commit-id>
To mark commit bad with bisectgit bisect bad <commit-id>
To list the bisect commitsgit bisect log
To enter bisect start
And mark all commits as good from now
git bisect start
git bisect good
To enter bisect start
And mark all commits as good from now
git bisect start
git bisect bad
To exit bisectgit bisect reset
  • git merge feature-2
  • combining the branch commits on git. This works as a merging child branch → master/parent branch.
  • All commits in the child branch are moved to the parent branch in a linear(time creation basis one after one) way.
  • This Merge helpful in a way that once feature branch is fully ready, then we need that feature on main application code (which is master), merge helps to copy all files and commits from feature branch to master/main(Dev) branch where we have entire code

Steps to merge :

(i) First we have to checkout to a branch where we need child/feature branch files and commits

git checkout master

(ii) Run the merge command

git merge feature-2


Observations  :

(i) Git merge will create new commit and add all files from committed branch

(ii) it wont deletes the files from the old branch

  • Git merge <commit> , copies the spefic commit to the checkout branch
  • it is one of the way to copy a single specific commit to copy from one branch to another
  • It copies the commit with same name
  • it won’t change anything

Task : Copy a commit from feature-1 branch → master branch

  • git checkout feature-1
  • git log –oneline
  • git checkout master
  • git merge <commit-hash>
  • git log –oneline

Detailed : https://sagarfive.in/git/git-tutorials/7-git-commit/git-merge-commitcopying-commits-fast-forword/


  • while developing a project , there are a lot of commits that may be in the main branch or child branch. We don’t know when the branch with commit is developed .
  • If we perform a merge, it adds commits in time linear (time sort) basic,
  • so it will effect in testing, moving to production that particular commit ,
  • so git rebase will merge child branch commits to main branch as latest commits.

(i) Move to child branch or any branch :

git checkout feature-1

(ii) Rebase the master :

git rebase master

(iii) Merge child with master :

git checkout master
git merge feature-1

Observations :
We can see all the commits from master branch are moved to last and all commits from feature-1 came top/ as latest

Git Rollback(git reset) :

The term reset stands for undoing changes. The git reset command is used to reset the changes.
The git reset command has three core forms of invocation. These forms are as follows.
(i) Soft
(ii) Mixed
(iii) Hard

The term reset stands for undoing changes. The git reset command is used to reset the changes.
The git reset command has three core forms of invocation. These forms are as follows.


(i) Soft : Move to that specific commit on that branch, by moving all files to staging area

git reset –soft 327bce5

(ii) Mixed : Move to that specific commit on that branch, by moving all files to Working directory

git reset –mixed 327bce5

(iii) Hard : Move to that specific commit on that branch, by removing files(not shown in the directory, but keeps in .git folders)

git reset –hard327bce5


  • Git revert is used to move to a specific commit changes in a branch by creating a new commit has a latest one along by keeping old commit in that branch.
  • With this if we need to go back to previous also possible
  • git revert <commit-hash-to-revert>

Git rebase drop : dropping the commit

  • drops the exising commit from commit history
  • we drop commit by running this command git rebase -i HEAD~n ( n is number of last commit count)
  • An Editor opens , it shows commits names , there we need to change pick with drop infront of the specific commit which we want to drop
  • Before commit drop
  • git rebase squash is used to merge the existing commits to its latest top commit
  • It will hide the commits, when we list it with git log –oneline
  • to rebase squash, 
  • run the command : git rebase -i HEAD~n(n is last number commits)
  • ex : git rebase -i HEAD~2 (for last 3 commits)
    • once running the above the command, editor opens replace the pick with squash
  • Cherry-picking copies the some commit information and changes from one branch into another branch.
  • It will create new commit and adds the changes/information
  • In case you made a mistake and committed a change into the wrong branch, but do not want to merge the whole branch. You can revert the commit and apply it on another branch.
  • git cherry-pick <commit-hash>


Steps : 

(i). Checkout to a particular branch(To branch) : git checkout master

(ii). Command : git cherry-pick <commit-id>

(iii)To get commit id by this command : git log –oneline


Git head :

  • The HEAD points to the last commit in the current checkout branch. It is like a pointer to any reference.
  • The HEAD can be understood as the “current branch.” When you switch branches with ‘checkout,’ the HEAD is transferred to the new branch.
  • To check the Current pointing to which commit we can user the below command
git log –oneline

Git reflog :

  • To view how many times head pointed moved
  • Indicates commit history
  • Indicates reset history
git reflog

(i) git reset :

  • git reset –hard <commit hash>
  • git reset deal with commits
  • git reset is used to go back to specific commit with in the same branch
  • it will simply move to old branch, it won’t create any new commit
  • It hash approches 
    • soft : Moved to commit with moving files to staging area
      • git reset –soft <commit hash>
    • mixed : Moved to commit with moving files to Working Tree
      • git reset –mixed <commit hash>
    • mixed : Moved to commit with by removing files from project
      • git reset –mixed <commit hash>

(ii) git revert :

  • git revert deals with commits
  • git revert is used to move to specific commit with in branch by creating a new commit without removing existing commit
  • git revert <commit hash> (at to branch)


(iii) git rebase : 

  • git rebase -i HEAD~n (n is last number commits)
  • the editor opens , pick replaced with the below words
  • git rebase also deal with commits
  • git rebase used to change the order, state of commit
  • to hide commit/merge with latest commit : squash
  • To rename commits : reword
  • To drop commits : drop
  • To change the order, move the line up and down(as per your required order)
  • In Git, “origin” is a short name for the remote repository that a project was originally cloned from.
  • it is used instead of that original repository’s URL – and thereby makes referencing much easier.

Creating remote origin :

git remote add origin <repository url>
git remote add origin https://github.com/sagarfive/nature-website

We can also use other names for repository shortname

git remote add origin <repository-url>
git remote add origin-nature-new https://github.com/sagarfive/nature-new.git

List the remote repository:

List remote repository shortnamegit remote
List remote repository shortname with urlgit remote -v

IX. Git Branch

image credit : wavemaker
  • This feature is provided in git, so that developers can create code related to different functionalities on separate branches.
  • This helps the development team in creating the code in an uncluttered way. Later this code can be merged with the master branch.
  • Master is final developed code that can move to testing , beta and production servers.
  • Simple project structure of Git types of branches : Feature branches, Develop, Release branches, Hotfixes, Master
  • Here we can see , programmers develop project features at feature branches,  if feature initial unit testing done, result is perfect than he merge that branch with Develop branch, next release , next hotfixes (production code bug fix),  next to master → testing server → beta server → Production server.
  • By default branch in git is master
  • By Default branch in github is main


1Creating new branchgit branch <branch-name>Ex: git branch feature-1
2Rename branchgit branch -m <new-name>Ex: git branch -m “feature-one”
3Move to a branchgit checkout <branch-name>Ex: git checkout feature-1
4List the all branchesgit branch or git branch –lor git branch –list 
5Merge branch from existinggit merge <another-branch>Ex: git merge master
6Delete a local branchgit branch -d <branch-name>Ex: git branch -d test-branch
7Delete a Remote branchgit push origin -d <branch>Ex: git push origin -d test2
8Commit a code at a stagegit commit -m “commit1 or any” 
9To see commit for branchgit log –oneline
    • A Git project can have more than one branch. These branches are a pointer to a snapshot of your changes.
    • When you want to add a new feature or fix a bug, you spawn a new branch to summarize your changes.
    • So, it is complex to merge the unstable code with the main code base and also facilitates you to clean up your future history before merging with the main branch.
    1Creating new branchgit branch <branch-name>Ex: git branch feature-1
    2Creating new branch 2git branch <branch-name>Ex: git branch feature-2
    3Creating a new branch 3git branch <branch-name>Ex: git branch feature-3
    4To see list of branchesgit branchgit branch
  • Creating multiple branches
    • git branch <branch1> && git branch <branch2> ..
      • git branch feature1 && git branch feature2
  • To Get inside the branch, we need to checkout to that specific branch
  • git checkout <branch name >
  1. To see remote branches, run this command: git branch -r.
  2. To see all local and remote branches, run this command: git branch -a
  3. To see all local branches : git branch
  • Rename branch
    • git branch -m <new-name>
    • Ex: git branch -m “feature-one”
  • Delete a local branch :
    • git branch -d <branch-name>
    • Ex: git branch -d test-branch
  • Delete a Remote branch
    • git push origin -d <branch>
    • Ex: git push origin -d test2
  • Main/Master : 
    • Git master/main branches : main branch, containes stable code
  • Child branches: 
    • We can create child branches from master 
    • It will copy the files and commits from master/main branch
    • It will be new playground, we can add features,bugfix …
    • The changes made here, won’t available,move,effect the main/master branch
    • Once after working with child branches, we merge this branches to main/master, if we need, ex: feature, bugfix
    • Some branches, stay long , ex : dev, release, qa 
  • git branch merge : To copy commits(files, changes, logs) from one branch to another
  • ex: git merge <feature1>
  • git branch merge : To copy commits(files, changes, logs) from one branch to another as latest commits
  • steps :
    • git checkout to from branch
    • git rebase <to branch>
    • git checkout to <to branch>
    • git merge <branch name> or <commit hash>
  • git branch merge : To copy commits(files, changes, logs) from one branch to another
  • ex: git merge <feature1>
  • git branch merge rebase : To copy commits(files, changes, logs) from one branch to another as latest commits
  • steps :
    • git checkout to from branch
    • git rebase <to branch>
    • git checkout to <to branch>
    • git merge <branch name> or <commit hash>
  • rebase add commits as latest once
  • When two branches are trying to merge, and both are edited at the same time and in the same file, Git won’t be able to identify which version is to take for changes.
  • Such a situation is called merge conflict. If such a situation occurs, it stops just before the merge commit so that you can resolve the conflicts manually.
  • To resolve the conflict, it is necessary to know whether the conflict occurs and why it occurs. Git merge tool command is used to resolve the conflict. The merge command is used as follows:
  • $ git mergetool
  • Using git rebase Instead of git merge. Using the “git merge” command is probably the easiest way to integrate changes from one branch into another. However, it’s not your only option: “git rebase” offers another, slightly different way of integration.
  • $ git rebase branch-B
  • To copy commits from the branch

X. Github Branch

GitHub is a Git repository hosting service. GitHub also facilitates many of its features, such as access control and collaboration. It provides a Web based graphical interface.

It offers both distributed version control and source code management (SCM) functionality of Git. It also facilitates some collaboration features such as bug tracking, feature requests, task management for every project.

Features of GitHub :

  • Git repositories hosting
  • Project management
  • Team management
  • Code hosting
  • Track and assign tasks
  • Conversations
  • git : version control system, free opensource, fast, scalable, it a tool/software, which we need to install and use
  • git hub : It is also version control tool, but it is a remote server, it is not fully free, we need to pay as per plans

Open github, login with your credentials 

2. Click on + icon right top corner, next click on New Repository

3. Now in the below, add the Repository name, Description, Select Public/Private, you can tick Readme file and next click on Create repository button at bottom.

4. Repository is created, we can see the UI below

Add local repository to github remote repository

–>Once after creating local git repository and remote repository in github (copy github repository url)

→ changing the default branch to main (default branch in git is master, but in gitlab is main), so you need to rename branch before uploading to remote repository in github

git branch -M main

→ adding remote repository

git remote add origin https://github.com/sagar-gith/bootstrap-cards.git

→ pushing the project from your local repository to github remote repository

git push -u origin main

When you’re doing it for the first time it asks for you to authenticate git bash with github, you redirect to github , sign in in the browser and it’s done !

Your project is added to remote github repository , let’s check by refreshing the repository at github

1Open a directorycd desktop
2Clone the repositorygit clone <repository-https-url>git clone https://github.com/sagarfive/explore-world-bootstrap-website.git
3Move into cloned directorycd <project directory name> (we can get that  by running ls command)cd explore-world-bootstrap-website
4List the filesls
5Check commitsgit log –oneline
  1.  After cloning or uplaoding the repository to git 
  2. We usually add changes
  3. To add changes
    1. Add files –> add to staging : git add . –> commit : git commit -m “commit-v1”
  4. Pushing the changes to remote repository(github)
    1. git push origin <branch>
    2. git push origin main
  • Using credentials with https : username and password
  • Auth tokens : secreat token
  • SSH Token : public private key
  • At github repository settings
  • Select contributer option
  • Add user email, once after succesfull verification(email verification) he will a contributer to your project
  • he has complete access, even it is private repository
  • A pull request is an event in Git where a contributor(developer) asks a maintainer(Project Manager, Senior Developer/Code Reviewer) of a Git repository to review code they want to merge into a project.
  • Developer made changes on feature-1 for a project, after development , he create pull request to merge the commit on master,Dev branch(Project Main branch contains stable code)
  • Then contribution able to see the pull request in the github repository pull request section/tab
  • He will review and merge the pull request
  • Webhooks allow you to build or set up integrations, such as GitHub Apps or OAuth Apps, which subscribe to certain events on GitHub.com.
  • When one of those events is triggered, we’ll send a HTTP POST payload to the webhook’s configured URL.
  • Webhooks can be used to update an external issue tracker, trigger CI builds, update a backup mirror, or even deploy to your production server. You’re only limited by your imagination.

Example : Github webhook-BuildTrigger-Integration-with-jenkins


(i) We can trigger jenkins buildjob using below methods

GitHub Marketplace contains tools that add functionality and improve your workflow. You can discover, browse, and install free and paid tools, including GitHub Apps, OAuth Apps, and GitHub Actions, in GitHub Marketplace.

We can integrate the apps to our gitrepository to add some functional

  • It is github managed service(Free and paid)
  • Used to deal with CI CD of projects with collabarating with azure devops and some tools
  • A Git tag is similar to a Git reference, but the Git commit that it points to never changes.
  • Git tags are helpful when you want to point to specific releases. These endpoints allow you to read and write tag objects to your Git database on GitHub.
  • The term pull is used to receive data from GitHub.
  • It fetches and merges changes from the remote server to your working directory. The git pull command is used to pull a repository.

Task/Demo : Pull the latest changes made in remote repository

  • git pull
  • Running the git pull , before pushing to repository is best practise

Git upload the local changes to the git repository with commit

1. Pushing the changes to main branch or specific branch

git push origin <branch-name>
git push origin main
  • Git “fetch” Downloads commits, objects and refs from another repository.
  • It fetches branches and tags from one or more repositories.
  • It holds repositories along with the objects that are necessary to complete their histories to keep updated remote-tracking branches.
1Fetch repogit fetch< repository Url>  
2Fetch specific branchfetch <branch URL><branch name>  
3Fetch all branchesgit fetch -all  
4Get latest changes /syncgit fetch origin  
  • git pull = git fetch + git merge  
git fetchgit pull
Fetch downloads only new data from a remote repository.Pull is used to update your current HEAD branch with the latest changes from the remote server.
Fetch is used to get a new view of all the things that happened in a remote repository.Pull downloads new data and directly integrates it into your current working copy files.
Fetch never manipulates or spoils data.Pull downloads the data and integrates it with the current working file.
It protects your code from merge conflict.In git pull, there are more chances to create the merge conflict.
It is better to use git fetch command with git merge command on a pulled repository.It is not an excellent choice to use git pull if you already pulled any repository

XI. Git Experience Based

#git push <github_repository_path> <branch_name>
(or)
#git push –set-upstream <branch_name>

# git fetch origin <branch_name>
# git checkout <downloaded_branchname>

git branch -merged It lists the branches that have been merged into the current branch.
git branch -no-merged It lists the branches that have not been merged.

We have developed one module in one branch and another module in another branch.
After the development, based on the requirement we do merge these two branches.
Or One branch is development branch, another branch is test branch

# git rebasing command is an alternative to merging in git.


# git remote set-url origin git://this.is.new.url

On GitHub, navigate to the main page of the repository.
• Under your repository name, click Settings.
• In the left menu, click Branches.
• Select the branch you want to mark protected using the drop-down menu.
• Select Protect this branch.

A ‘head’ is simply a reference to a commit object. In every repository, there is a default
head referred as “Master”. A repository can contain any number of heads.

Squashing multiple commits to a single one overwrites the history which is why it is
recommended to be done using full caution. This step can be done by running the
command: git rebase -i HEAD~{{N}} where {{N}} represents the number of commits
needed to be squashed.

Detached HEAD indicates that the currently checked-out repository is not a local
branch. This can be caused by the following scenarios:
When a branch is a read-only branch and we try to create a commit to that
branch, then the commits can be termed as “free-floating” commits not
connected to any branch. They would be in a detached state.
When we checkout a tag or a specific commit and then we try to perform a new
commit, then again the commits would not be connected to any branch. When
we now try to checkout a branch, these new commits would be automatically
placed at the top.

  • git branch –merged helps to get the list of the branches that have been
    merged into the current branch.
  •  git branch –no-merged lists the branches that have not been merged to
    the current branch.
  • git commit –amend
    • editor opens, write or edit the command
  • it is always advisable to create an additional commit rather than amending the
    existing commit due to the following reasons:
  • Doing the amend operation destroys the previously saved state of that commit.
    If only the commit message gets changes or destroyed, it’s acceptable but there
    might be cases when the contents of the commits get amended. This results in
    the loss of important information associated with the commit
  • Approach 1: Fix the bad changes of the files and create a new commit and push to the remote repository. This step is the simplest and most recommended approach to fix bad changes. You can use the command: git commit -m ” “
  • Approach 2: New commit can be created that reverts changes done in the bad commit. It can be done using git revert <name of bad commit
  • Sometimes we end up having certain files that are not needed in the git index when we are not being careful while using the git add command. Using the command git rm will remove the file from both the index and the local working tree which is not always desirable.
  • Instead of using the git rm command we can use the git reset command for removing the file from the staged version and then adding that file to the .gitignore file to avoid repeating the same mistake again.
  • git reset <file_name> # remove file from index
  • echo filename >> .gitingore # add file to .gitignore to avoid mistake repetition.

git merge : when need all the commits in time lineir mode

git rebase : when we need commits as latest one

This can be a time-consuming process if we are not sure what to look at exactly.
Fortunately, git provides a great search facility that works on the principle of
binary search as git-bisect command.
The initial set up is as follows:
git bisect start # initiates bisecting session
git bisect bad # marks current revision as bad
git bisect good revision # marks last known commit as good revision

Upon running the above commands, git checks out a revision that is labeled as
halfway between “good” and “bad” versions. This step can be run again by
marking the commit as “good” or “bad” and the process continues until the
commit which has a bug is found.

git reset –mixed command is used for undoing changes of the working
directory and the git index.
git merge –abort command is used for stopping the merge process and
returning back to the state before the merging occurred.

git revert :

  • This command is used for creating a new commit that undoes the changes of the previous commit.
  • Using this command adds a new history to the project without modifying the existing history


git reset :

  • This command is used for undoing the local changes done in the git repository
  • This command operates on the commit history, git index, and the working directory.


This command returns a tree object representation of the current repository along with the mode and the name of each item and the SHA-1 value of the blob

  • The git switch command is a fairly new command that can be used to perform switching between the branches, creating a new branch, and switching between the branches. The git checkout on the other hand is an old command using which we can create a branch and then move into the branch. The git checkout command also lets us switch to the branches that were recently active.
  • The git checkout command can also be used to undo and restore the changes of a commit. On the other hand, we cannot perform such operations using the git switch command.

git reflog is usefull.

Find the commit that you want to be on in that list and you can reset to it

(for example:git reset --hard e870e41).

(If you didn’t commit your changes… you might be in trouble – commit early, and commit often!)

Git head :

  • The HEAD points to the last commit in the current checkout branch. It is like a pointer to any reference.
  • The HEAD can be understood as the “current branch.” When you switch branches with ‘checkout,’ the HEAD is transferred to the new branch.
  • To check the Current pointing to which commit we can user the below command
git log –oneline

 there can be only one HEAD, since you cannot be at multiple places at once. 

1. Removing or fixing the bad file in a new commit and pushing it to the remote repository. Then commiting it to the remote repository using:
git commit -m “commit message”
 
2. Creating a new commit that undoes all the changes that were made in the bad commit, using the following command:
git revert 
 
Example: git revert 56de0938f
git show <commit hash>

or
git diff-tree --no-commit-id --name-only -r <commit-ish>
  • hooks concept
  • git hooks is the one that you are looking for. So to execute a script pre-push, you have to do is to create a pre-push file in the .git/hooks. So in this case put your bunch of code in the pre-post script file .git/hooks/pre-push and save it. Then make it executable by chmod +x .git/hooks/pre-push. After you done with this successfully you will be able to see the script gets executed each time you do run push command.

We can recover this by checking out the latest commit of this branch in the reflog and then checking it out as a new branch

SubGit is a tool for a smooth, stress-free SVN to Git migration. It creates a writable Git mirror of a local or remote Subversion repository and that way you can use both Subversion and Git as long as you like.
 
  • git status : Show want files are staged, committed and untracked
    commnad : git status
  • git log :  show the history of commits
    • commnads : git log  –> long list
    • git log –online –> short list
  • git diff : to the difference between two files
    • git diff <file1> <file2>
  • git revert : Moving to specific commit changes by creating new commits
  • git reset : moving to specific commits in the branch

Use git rebase -i <after-this-commit the n number of commit count> and replace “pick” on the second and subsequent commits with “squash” 

  • you should be able to do git reflog --no-abbrev and find the SHA1 for the commit at the tip of your deleted branch,
  • then just git checkout [sha]. And once you’re at that commit,
  • you can just git checkout -b [branchname] to recreate the branch from there.

Instaweb is a script used to set up a temporary instance of GitWeb on a web server for browsing local repositories. Instaweb requires, at a minimum, a light-weight server such as lighttpd or webrick.

When --cached is given, the staged content has to match either the tip of the branch or the file on disk, allowing the file to be removed from just the index.

So, for a single file:

git rm --cached file_to_remove.txt

and for a single directory:

git rm --cached -r directory_to_remove
  • broken commit : git –amend, editor asks,, add/edit commit
  • made the changes and add new commit,so additional commit created


  • To push code to remote repository
  • We need to authenticate
    • git credentails using https
    • git ssh keys
    • git secreate token
  • To restore branch
  • refrog to find the hash code of commit of that branch
  • git checkout -b commit
  • git checkout -b branch
  • contains files and commits

Git can use four distinct protocols to transfer data: Local, HTTP, Secure Shell (SSH) and Git.

The git pull command is used to fetch and download content from a remote repository and immediately update the local repository to match that content.

  • We can use git with jenkins
  • with github actions
  • Azure devops
  • All git based ci cd tools

integration with Git distinct protocols to transfer data: Local, HTTP, Secure Shell (SSH) and Git.

Git can be integrated with code quality tools like SonarQube or CodeClimate to automatically check the code for potential issues and report them. This can be done by configuring the tool to run automatically as part of a Continuous Integration (CI) pipeline that is triggered by Git commits. Here is an example of how to configure SonarQube with a Git project using the SonarScanner CLI:

  1. Install the SonarScanner CLI on your machine.
  2. Add a sonar-project.properties file to your Git project with the following contents:
sonar.projectKey=your_project_key
sonar.projectName=Your Project Name
sonar.projectVersion=1.0
sonar.sources=.
  1. Run the SonarScanner CLI from the root directory of your Git project:
sonar-scanner

This will analyze your code and report any potential issues to the configured SonarQube server. You can then view the results in the SonarQube dashboard.

credits : https://www.adaface.com/blog/git-interview-questions/#q54


When working with a distributed team, Git can be used to facilitate collaboration and ensure everyone is working with the most up-to-date code. Here are some tips:

  1. Establish clear guidelines for branching and merging to avoid conflicts.
  2. Use a central repository that everyone can push to and pull from.
  3. Communicate frequently to ensure everyone is aware of changes and updates.
  4. Use pull requests or code reviews to ensure code quality and avoid introducing errors.
  5. Encourage the use of descriptive commit messages to provide context for changes.

Example code snippets:

# Clone the central repository
git clone <repository-url>

# Create a new branch for your changes
git checkout -b <branch-name>

# Push your changes to the central repository
git push origin <branch-name>

# Review changes from a team member's branch
git fetch <team-member>
git checkout <team-member>/<branch-name>

A Git hook is a script that Git can execute before or after certain events, such as committing or pushing changes. Hooks can be used to enforce coding standards, run tests automatically, or perform other tasks. Git comes with a set of default hooks, but custom hooks can also be created. To use a hook, it must be placed in the .git/hooks directory of a Git repository and made executable. Here’s an example of a pre-commit hook that checks for whitespace errors in changed files:

#!/bin/bash

if git rev-parse --verify HEAD >/dev/null 2>&1
then
    against=HEAD
else
    against=$(git hash-object -t tree /dev/null)
fi

# Find files that have been changed
files=$(git diff-index --cached --name-only $against --)

# Check for whitespace errors
if [[ -n $files ]] && [[ $(grep -c -E "^\+.*[[:space:]]+$" $files) -ne 0 ]]; then
    echo "Error: trailing whitespace detected in some files."
    exit 1
fi

exit 0

To use Git with a build tool like Maven or Gradle, you can configure the build tool to include Git information in the build. This can be done by adding a plugin to the build tool’s configuration file. For example, in Maven, you can add the Git Commit Id Plugin to the pom.xml file to include the Git commit ID in the build. Similarly, in Gradle, you can use the Gradle Git plugin to include Git information in the build. Here’s an example of how to add the Maven Git Commit Id Plugin:

<build>
  <plugins>
    <plugin>
      <groupId>pl.project13.maven</groupId>
      <artifactId>git-commit-id-plugin</artifactId>
      <version>4.0.0</version>
      <executions>
        <execution>
          <goals>
            <goal>revision</goal>
          </goals>
        </execution>
      </executions>
      <configuration>
        <dateFormat>yyyy-MM-dd'T'HH:mm:ssZ</dateFormat>
        <gitDescribe>
          <abbrev>7</abbrev>
          <always>false</always>
          <dirty>-dirty</dirty>
          <match>*</match>
          <tagNameFromGitDescribe>true</tagNameFromGitDescribe>
        </gitDescribe>
      </configuration>
    </plugin>
  </plugins>
</build>

Git Flow is a branching model for Git that defines a strict branching and merging strategy. It consists of two main branches: master and develop, and several supporting branches for feature development, releases, and hotfixes. Git Flow provides a clear and organized workflow for collaborating on a project and makes it easy to track progress and manage releases. To use Git Flow, you can install the git-flow plugin and run commands such as git flow initgit flow feature startgit flow release start, and git flow hotfix start.

Git can be integrated with project management tools like Jira or Trello to track code changes, manage issues and collaborate with team members. You can link Git commits to Jira issues by mentioning the issue key in the commit message. With Trello, you can attach Git commits to cards and track progress of a feature. Git hooks can also be used to enforce certain rules such as requiring a Jira issue key in the commit message before allowing a commit to be pushed. Here’s an example of linking a Git commit to a Jira issue:

git commit -m "Add new feature XYZ-123"

where XYZ-123 is the Jira issue key.

To use Git with a Continuous Deployment (CD) tool like Jenkins or CircleCI, you can follow these steps:

  1. Configure your Git repository to trigger a webhook on every push.
  2. Set up a Jenkins or CircleCI project to listen for webhook events from your Git repository.
  3. In your Jenkins or CircleCI project configuration, specify the branch you want to deploy and the deployment commands:
# Example CircleCI configuration in .circleci/config.yml
version: 2
jobs:
  deploy:
    docker:
      - image: circleci/node:14.17
    working_directory: ~/app
    steps:
      - checkout
      - run: npm install
      - run: npm test
      - run: npm run build
      - run: npm run deploy
  1. In your Git repository, create a deployment script that can be run by your CD tool:
# Example deployment script
#!/bin/bash
echo "Deploying..."
# deployment commands go here
echo "Done."
  1. Commit your changes and push them to Git.
  2. Your CD tool will detect the webhook event, run your deployment script, and deploy your application.

Note: These are general steps, specific configuration can differ depending on the tools and technologies used in the project

To use Git with a build automation tool like Jenkins or Travis CI, you can follow these steps:

  1. Configure your Git repository to trigger a webhook on every push.
  2. Set up a Jenkins or Travis CI project to listen for webhook events from your Git repository.
  3. In your Jenkins or Travis CI project configuration, specify the branch you want to build and the build commands:
# Example Travis CI configuration in .travis.yml
language: node_js
node_js:
  - 14
script:
  - npm install
  - npm run build
  1. In your Git repository, create a build script that can be run by your build tool:
# Example build script
#!/bin/bash
echo "Building..."
# build commands go here
echo "Done."
  1. Commit your changes and push them to Git.
  2. Your build tool will detect the webhook event, run your build script, and build your application.

Note: These are general steps, specific configuration can differ depending on the tools and technologies used in the project.

Git can be used to manage code quality by integrating with static code analysis tools like SonarQube or Codacy.

To integrate SonarQube with Git:

  1. Install the SonarScanner for your programming language and run it on your codebase:
$ sonar-scanner
  1. Configure the SonarQube server URL and access token in your Git repository:
$ git config sonar.host.url <sonarqube-url>
$ git config sonar.login <sonarqube-token>
  1. Add a Git hook to automatically run the SonarScanner on commit:
$ curl -sL https://raw.githubusercontent.com/SonarSource/sonar-scanning-examples/master/gitlab/.gitlab-ci.yml > .git/hooks/pre-commit
$ chmod +x .git/hooks/pre-commit

To integrate Codacy with Git:

  1. Sign up for a Codacy account and create a new project for your Git repository.
  2. Add a Codacy token to your Git repository:
$ git config --global codacy.apiToken <codacy-token>
  1. Add a Git hook to automatically run Codacy on commit:
$ curl -Ls --output codacy-coverage-reporter https://github.com/codacy/codacy-coverage-reporter/releases/download/4.1.0/codacy-coverage-reporter-linux
$ chmod +x codacy-coverage-reporter
$ curl -sL https://raw.githubusercontent.com/codacy/git-codacy-coverage/v4.1.0/git-codacy-coverage > .git/hooks/pre-commit
$ chmod +x .git/hooks/pre-commit

This allows you to automatically check the quality of your code with every commit and receive feedback on how to improve it.


The Forking Workflow is fundamentally different than other popular Git workflows. Instead of using a single server-side repository to act as the “central” codebase, it gives every developer their own server-side repository. The Forking Workflow is most often seen in public open source projects.

The main advantage of the Forking Workflow is that contributions can be integrated without the need for everybody to push to a single central repository that leads to a clean project history. Developers push to their own server-side repositories, and only the project maintainer can push to the official repository.

When developers are ready to publish a local commit, they push the commit to their own public repository—not the official one. Then, they file a pull request with the main repository, which lets the project maintainer know that an update is ready to be integrated.

To answer this question, you can talk about your workflow. For example, explain how you’ve used Git in the past as your version control system for working between machines or sharing with multiple developers.

To answer this question, you can talk about your workflow. For example, explain how you’ve used Git in the past as your version control system for working between machines or sharing with multiple developers.